January 24, 2014

How to Create Animated GIF using Camtasia Studio from Video and Images

Camtasia is a powerful desktop screen video recorder which is used by many people all over the world in all most all the fields. And yes here at TechTricks also we use camtasia to record the video tutorials. (You can check our the videos created with camtasia here on our YouTube channel). Camtasia is so powerful with so many advance features with simple user interference.

Camtasia can not only allow you to record your desktop video, It also allows you to save the video in the GIF image format! with simple one click.
camtasia

How to Create GIF from your Own Video:

In this post we are going to show you How to create GIF images with camtasia. If you are not interested in creating the GIF images on your computer then check this post to create the GIF images online.

Note: Before getting started you need to get the camtasia from here [official link] free version is available for 30 days.
  • If you want to create a GIF from already created video then you can directly import the video by hitting on import media.
import+media
  • If you want to create a GIF from the video which is to be recorded by using camtasia then you can Hit On "Record the Screen" and start recording your activity on your desktop.
record
  • After completion of the recording your video edit the video as per your need. And then Hit on Produce and Share.
porduce+and+share
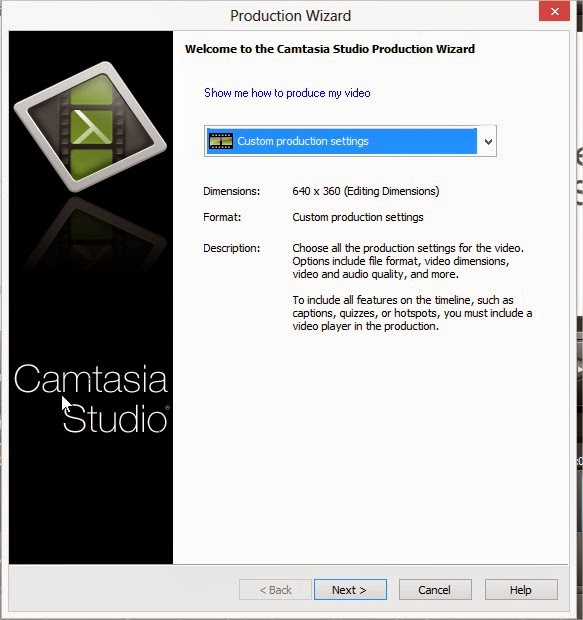
  • When you click on Produce and Share you will get the a popup windowwith title "Production Wizard".Just like in below screen capture.
+Production+Wizard
Select the custom production settings and click on next to continue.
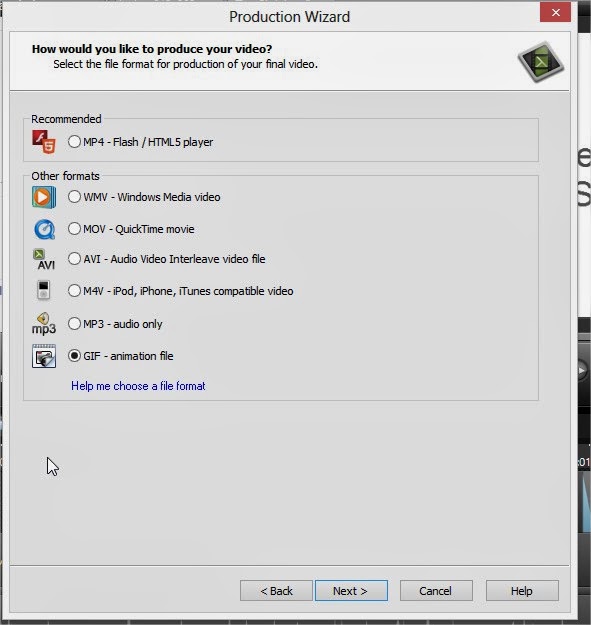
  • In the next window you can select the format of the output video.As our Aim is to create the GIF image we will select the GIF and click on next.
Production+Wizard2
And the remaining steps are so simple you can continue by hitting next button and create the GIF image.

Conclusion:

Camtasia is a huge software.To create the simple GIF images from the videos need to try these Online tools which are really too small in size when compared to Camtasia.

January 23, 2014

How to Create My Own Animated GIFs Online - 5 Best Ways

     GIF stands for Graphics Interchange Format. Well normally you have seen many times moving images if you thing they are videos then you are wrong!! Here in this article we explained what are GIFs actually and how to create them online easily.
create+your+own+gif

What Is The Concept Behind GIFs ? 

Graphics Interchange Format is a technique in which images are compressed to lessen their size without compromising the quality of the images. This technique of compressing the images was first patented in 1985.

How To Create Your Own GIFs : 

There are numerous way to create your own GIFs, but here are some selected few which are simple and efficient ways to make your own GIF online.

1.Make a Gif:

One of my favorite option available on internet. Make a Gif has a very user friendly interface and you are just a 2-3 steps away from making your Gif.
make+a+Gif
Using Make a Gif you can select images like around 10 images to create your Gif. Morevover Make a Gif allows you to create Gif directly from a YouTube Url.
Limitations I can say is,the image you wish to upload should be less than 2 MB.

2.IMGFlip:

Just  another option for you to create you favorite Gif. ImgFlip allows you to directly create Gifs from the existing videos or you can share a link of video from interet as well.
upload+images+and+generate+gif
  • ImgFlip provides a wide option for customizing you GIFs.You can specify the speed,size,FPS( frame per second)etc.You can download you Gif once you've done with everything for free .
  • You can directly add the video url from any website.All the popular format like - flv, avi, mov, mp4, mpg, mpeg, wmv, 3gp of videos are supported by IMG Flip.
  • Basically,you can create videos upto 70 MB , but IMG Flip allows videos of size 100 MB. I think the free version will also do if you want to convert a video in Gif.
  • So overall, IMG Flip is also a great option for you to create your own Gifs.

3.Gif Maker:

Gif Maker is another online portal which helps you create awesome Gifs without giving a single penny. One I like about Gif Maker is,it does not require any kind of registration.
So as shown in the image, it comes with a control panel where you can customize your Gifs accordingly.
create+my+own+gif
  • Main features we can see here is – The size of the video ( Canvas or Frame ), the speed of the animation,also you can directly give a url of any video from internet.
  • Once you have created your Gif, you can download it. The image format supported are - .png , .jpg or .gif .
  • Gif Maker is good in all sense but the size of the image you are uploading should be less then 2 MB , pretty less .
  • Gif Maker is so user friendly that even a non technical person can use it and create his/her own Gifs.
So , if you want to create a Gif of small size images, Gif Maker comes handy.

4.Gickr:

My favorite Gif maker as it can create Gifs of images ranging from kb to mb.Size of the images is not the issue for Gickr.
  • If you are using Flickr,the Gickr will be the best option as you. Thisonline portal allows you to directly grab images from Flickr or upload from your computer.
  • Just like other option shared here,Gickr also enables converting the You Tube videos into your favorite Gifs. You can add at the max 10 images for creating funny and flashy Gifs.
  • Once you have done with it you can download it and use it anywhere you want.Gickr is good the customization option are less as compared to IMG Flip. You can also control the size and speed of the images and videos.

5.Picasion:

One of the most widely used option to create Gifs online.Picasion gives lot of option to choose images from.You can select from Flickr, your picasa account or directly from your system.
The biggest advantage is, Picasion gets connected to your webcam and hence you can just take click or make video and it automatically gets uploaded to Picasion( Obviously you internet connection should be enabled ).
make+your+own+gif
Picasion and Gickr mostly have the same features. Picasion also accepts 10 images of variable sizes. You just have the control of speed and size of your Gif that you are creating.
When you are in hurry and just need a Gifs , Picasion wiil be the quick solution for you.

Conclusion :

So next time you want to create a banner or want to create some GIFs our own to be placed on your website don’t forget to refer this article. don’t forget to share your experience of how and where you use Gifs.Comment section is all yours. Cheers ! 

Connect All your Computers with Single Mouse and Keyboard

        Every computer has a keyboard, mouse, and monitor but now there is no need to have mouse and keyboard for every computer. If one computer has Keyboard then it can be used on other computers too without disconnecting the mouse and keyboard. So one mouse and keyboard are sufficient to manage all the things on multiple computers. This is made possible by Synergy.

single+keyboard+for+different+PCs

About Synergy:

Synergy is a small and powerful tool which lets you to use the mouse and keyboard on your different computers as a single mouse for all your computers.
Using synergy is so simple,It has simple user user interference which makes the users to understand the settings easily.
Synergy supports all the three major desktop operating systems Linux,Windows and MAC Os,(Under development for Mac OS X Mavericks). It is available for both 32 bit and 64 bit computers in respective formats.
connect+pc+with+single+mouse+and+keyboard

Here are great features of Synergy:

  • Supports encryption of information between your computers. (This way you can portect your files from bad guys in your network).
  • Simply move the mouse to the computer on which you want to work with your keyboard.
  • Copy the files to clipboard and share the files in other computers!.
  • Drag and Drop feature is avaible for Windows and MAC computers.
  • Only a local network connection is needed which establishes the connection between your computers.

Once look at below things:

  • Before you continue further make sure that the computers you want to use are on the same local network.
  • Make sure you turn on the network discovery and your computers are visible on local network.
  • And you need to know these terms that will be used here in this tutorial.
Server System: Here the server system is your main computer to which the mouse and keyboard are connected.
Client System: Here the client system is your secondary computer to which there is no mouse and keyboard connected. There can any number on client systems.

Installing-Configuring Synergy on your Computers

  • Now Download the Synergy software respective to your Operating systems.
  • For example if you are running Windows then you need to get the Windows version on Synergy from here [official link].
  • And if you are using Linux or MAC OS then you can get the Synergy verison which supports from here [Official link]
  • First Download this Synergy on to the server system ( which is connected with mouse and keyboard).

Configuring the server system:

  • After installation when you run Synergy on your computer you are allowed to choose the type of the computer(server or client).
  • As you have installed this software first on the system which is going to act as server. we are showing on configuring the server.
  • Click on the "configure server".
  • As you hit on "Configure Server" You will be presented with a new window titled server configuration.
2
  • Here in this screen shot Linux-Mint is my server computer and Windows 7 is my client computer (which doesn't have mouse and keyboard connection).
  • If you know what you are doing with the settings then you can play with the other advanced settings else leave them.
  • Now hit on save to complete your server configuration!.
  • And note down the server  IP address shown in the window.

Configuring the client computer:

  • Client computer is your another computer which doesn't have the mouse and the keyboard.
  • You need to install the synergy software on client system too.
  • Configuring the client computer is same as configuring server machine.except choosing the client option instead of server option (in server configuration).
4
  • After selecting it enter the server ip address. Click on apply.
  • To starting sharing the computer.open your server computer and click on start then click on start on the client computer.
That's it you are now done and you can share the single mouse and keyboard on multiple computers.
If you have liked this open source software..Please support them by donating.
If you feel this is hard to setup you can try the ShareMouse software which does the same work as Synergy.

January 16, 2014

How to enable multiple remote desktop user logins in Windows 7

How to enable multiple remote desktop user logins in Windows 7

Windows remote desktop connection application can be used in order to connect to another PC on the same network or the internet. Both computers should use Windows and have the “Remote desktop connection” application available. For example, you can use all of your work computer’s programs, files, and network resources from your home computer, and it’s just like you’re sitting in front of your computer at work. You can also use it to access an application that is only installed on a single computer, by multiple users at the same time.

Windows 7 do not allow the concurrent use of a single computer by multiple users. This means that a user needs to be signed out before a second user logs in. This is not the case for the server editions of Windows. Luckily there is a patch that allows you to override this setting and connect multiple users at the same time on a single computer. The will even be able to use the same applications at the same time.
CAUTION: The following steps are probably going against the windows EULA agreement and could cause harm to your computer. I have already tested both of the patched below on windows 7 professional edition installations and could not find any issues.

Patch 1 (Does not work on Win 7 SP1)

The first patch just enables multi-user support for the Windows remote desktop connection tool:
  1. You need to download the following zip file: Win7RDP.zip.
  2. Unzip the contents in a folder (let’s say you have used the following path:  “C:\Win7RDP\”).
  3. Execute the file install.cmd by double clicking on it.
  4. You should see a screen similar to the one below, if everything works fine.


  5. Patch 1 sucessful execution screen
  6. After the end of the patching process the remote desktop connection of your pc provides multi-user support.

Patch 2

The following patch application lets you choose whether or not to enable multiuser support for the remote desktop connection process or/and to disable the no blank password policy that is enforced on users that need to connect remotely. Follow the steps below to access the application.
  1. Download the file Concurrent_RDP_Patcher_2-22-2011.zip
  2. Open the compressed file and execute the file “Concurrent RDP Patcher.exe”
  3. You should see the following screen           
  4. Remote desktop concurrent connections patcher
  5. Check the desired options and then click the patch button.

January 8, 2014

Drive Not Opening issue & Virus Remover Softwares

       With the popularity of USB removable media, more and more viruses started to appear that could take advantage of the ease at which these devices can be transferred from machine to machine using plug and play. It was quite easy to rewrite the Autorun.inf file to launch the malware on insertion of the drive because in general it is not write protected. It’s not just on removable drives that the autorun file can be created on though, it can be burned to a CD/DVD and also created on local hard drives including the system drives.

     An autorun.inf file at the root of your local drives can be problematic because when you open My Computer and try to access a drive, it could run a virus to infect your computer. Quite often antivirus software doesn’t touch autorun.inf because it’s only an instruction file that tells Windows what to automatically run when you access the drive from My Computer, not the malicious file itself. So even after the virus has been cleaned, you might find that you’re unable to access your C drive because autorun is pointing to the removed virus. A search window could appear, a script/file might try to to run or when double clicking your drive, it gives you an option to choose a program to open instead.

1. Disk Heal

Disk Heal is a useful tool that restores the condition of your storage device after being infected by a virus. Although it’s not in development any more, Disk Heal is a useful tool that performs many functions, most of which are quite useful. While there are loads of tweaks you can apply to different areas of your system such as Control Panel, Internet Explorer, Appearance and Security, the Fix section is what makes the program more valuable to the user.


After installing and running Disk Heal, click on the Fix tab. In addition to being able to sort out the drive problem, it can also fix Folder options, Task Manager and Regedit being inaccessible after a virus infection. The option to fix the drive is at the top, and you simply enter the letter of the drive which has the problem into the small box and press the Fix button. If any other drives have a similar issue, repeat the process. Disk Heal doesn’t actually delete the Autorun.inf file itself but blanks its contents rendering the autorun function ineffective. A reboot or logoff will be required to complete the process.

There’s also another useful cleanup function at the bottom to restore hidden files and folders that have been hidden by a virus and they can’t be seen. Disk Heal is a standalone executable so can be copied from the Program Files folder to make it portable.

Download Disk Heal

2. FixDrive

If Disk Heal has functions you have no interest in and simply want to sort the problem of your drive not opening in My Computer, then FixDrive is what you want. The program is small (60KB) and portable so requires no installation. It is described by the developer as a tool to fix the issue of Network drives not opening when you double click on them, but the same principle applies to other drives such as C.


FixDrive couldn’t be much easier to use, extract from the zip file and then run it, select the drive you want to repair from the selection box and click Fix. If there is an Autorun.inf present on the drive in question, it will be deleted completely. After a logoff or reboot, you should be able to open the drive on double click again.

Download FixDrive

3. Flash Disinfector

This tool is developed by sUBs who also created the ComboFix malware removal program. It’s slightly different to the other tools above because it also has a limited ability to remove some autorun viruses while they are still attached to the inf file. In addition to USB flash drives, Flash Disinfector can remove the autorun file leftover from viruses on local system drives that are causing the folder to not open in My Computer.

It’s very easy to use, just run Flash_Disinfector.exe and it will tell you to plug in your flash drive that is infected by malware. If you want to repair a fixed drive, just press the button to start. The screen will then go blank for a few seconds, then you’ll see a popup window saying “Done!!”. Once completed, all autorun files will be gone from your drives and replaced with a protected folder called Autorun.inf, this is quite normal and a preventative measure to stop future autorun virus issues.


If you actually don’t want the autorun folder on your drive, it can’t be deleted normally and use of the command prompt to remove is a quick way to do it. Open up a Command Prompt window (type cmd in the run box) and enter the following:


Attrib -R -S -H /S /D C:\Autorun.inf

RD /S C:\Autorun.inf

Press Y to confirm delete and the folder along with the dummy file will be removed. Obviously substitute C:\ for any drive letter you wish. The two commands above can also be used to delete the original autorun.inf manually if you have any problems with the listed tools for any reason.

Download Flash Disinfector
If Your Problem is not Autorun Related

Even though this problem is mostly related to the leftover Autorun.inf file, there is another way your drives in My Computer can be stopped from opening. A few incorrect settings in the Windows registry can also open other windows such as search or programs on double click similar to the Autorun issue. Windows Vista, 7 and 8 can all be affected as well as XP because similar registry keys are present in all versions of Windows.

This has a simple solution which research seems to suggest fixes the problem the majority of times with a single command typed into the Run dialog. Open Run (win key+R) and type:


regsvr32 /i shell32.dll

Re Registering the shell32.dll file resets a number of Windows shell functions that can possibly become corrupted causing various issues, including opening drives in My Computer.