Symptom
"Hey guys, I bought a brand new 64GB USB flash drive with the purpose of carrying documents and other files between home and company. It was formatted to NTFS to store data, which was proved too slow. Recently it reports errors when it is connected to computer and yesterday it asked me to format it. So I tried to reformat it to FAT32. The problem is that formatting can't be performed successfully and gives error message 'Windows was unable to complete the format'.For the moment, the USB flash drive turns inaccessible and can't be formatted. I really need to be able to format it and make it normal to use, as it holds important documents. Any help will be greatly appreciated!"

This is one of those frequently asked questions on many forums and question sites and this post will give detailed and overall explanation about this issue. USB flash drives or memory cards are useful storage devices in modern society, as they are capable of storing a large amount of data but occupying small physical space. USB flash drive is easy to carry and transfer data, and memory cards, with smaller size, have become essential component in various digital products such as digital camera, cell phone, MP3 player, etc. USB drives are important to users and it's necessary to learn skills and solve the problem.
Main causes that Windows can't format USB drive
Now and then, you need to format USB flash drive or SD card but get error messages saying Windows couldn't format the drive. This error may happen as a result of following reasons:

Virus infection
USB drives are very portable and they can be connected to computer easily via USB drive to backup or transfer data. Since they are often carried by users and might be used on various computers, USB drives are more likely to get damaged or infect virus. Every time you plug a USB drive into USB port of computer which is not protected by antivirus software such as public computers, USB drive will infect virus which often acts with a manner that fill USB drive with dangerous files and makes USB drive stop working.Storage devices have bad sectors
Storage devices have bad sectors. As we all know, storage devices consists of sectors which are the smallest unite for data storing. Files stored on hard drive or USB drive usually occupy discontinuous sectors. Bad sector means the sector is damaged and can't be read or written, thus bad sectors can disrupt the formatting operation as well as file recovery. There are quite a few causes of bad sector, like bad quality, excessive defragmentation, unplug USB drive directly while it is working, etc.

Storage device damage
Physical damage is another reason that makes storage device inaccessible. All components of USB drive or local disk can't escape physical damage. Computer won't be able to format the device if it can't use the device, such as chip or circuit board doesn't work. Professional repair center can replace damaged circuit and other damaged part to make it workable again. Whereas, the replacement process costs quite higher than the USB drive itself.Disk is write-protected
Besides, Windows can't format a drive which is write-protected. When USB drive gets well connected to computer, you start to copy some documents to it, then it reports messages "The disk is write protected. Remove the write protection or use another disk." As formatting is a kind of writing operation, so you need to remove the write-protection before formatting it.
How to fix Windows couldn't complete format on USB drive
If you are not capable of formatting your USB drive (USB flash drive, external hard drive, SD card, pen drive, etc.) in usual process then try to format that drive with following methods. Now connect USB drive to computer and follow step-by-step guide given below:
You should note that all these solutions won't be workable if the USB drive gets badly physical damage. Thus there is no guarantee that these methods work on all scenarios. What's more, make sure that important data and files of the drive to be formatted have been backed up, as files will be erased once the drive is formatted. If USB drive became inaccessible before you had time to backup data, then you need to perform file recovery first prior to formatting. Steps of file recovery from damaged USB drive will be talked in next section of this post.
Solution 1: Format via Disk Management
Disk Management is provided by Windows and it helps to manage partitions and disks for computer. Disk Management is able to create new volume, extend or shrink partition, change drive letter, delete or format partition, etc. Damaged flash drives can be formatted within Disk Management. If USB drive uses unrecognized file system format or becomes unallocated or uninitialized, it will not show in My Computer or Windows Explorer. Thus it's not available to format the drive through right-click menu "Format" option.Step 1
Open Disk Management. Right click on My Computer and select item "Manage", and then click Disk Management on the left side. In the center section you can see local hard drive and partitions and the USB drive which can be recognized by capacity.

Step 2
Right click the flash drive and select "Format" option and select file system format to perform quick format. However, this action is not workable in some cases, and you need to try step 3.
Step 3
Right click on the USB drive and select "New Simple Volume" item. You'll get the New Simple Volume Wizard which guides you recreate new partition for the flash drive. Operations are following the onscreen instructions, setting options and click "Next" button. When the process is done, you'll find the USB drive has been formatted and is properly recognized by system.
Solution 2: Format with Command Prompt
Disk Management is not almighty and it is not helpful in many cases. Thus we need to switch to command line based formatting solution. It looks like this method is complicated to common users, but it is not. Follow steps below and see whether it can get everything done.Step 1
For Windows 7 users click Start button and type cmd in the search both and press Enter. If UAC is enabled, you need to find Command Prompt from start menu and run it as administrator.
Step 2
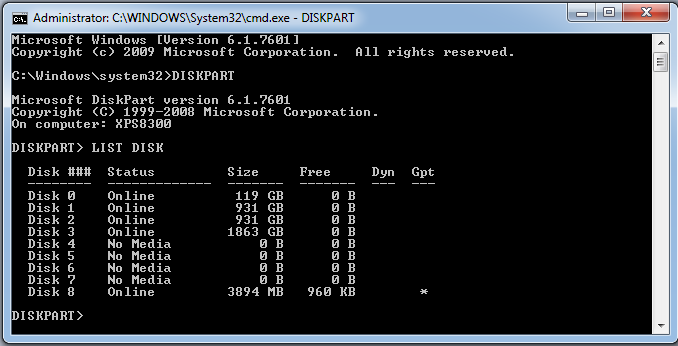
Type command diskpart on the black windows and press Enter key. Then you can see partition and disk list of current computer. All drives are listed with numbers and Disk 4 is the flash drive in question.

Step 3
Continue typing disk 4 which is the problem drive and clean and press Enter. The drive will be scanned and its damaged file structure will be erased during scanning. Once the process is done, it reports confirmation message telling that it has successfully cleaned the drive, and new partition need to be created.
Step 4
Type create primary partition and hit Enter; next type in Command prompt format /FS:FAT32J: (you can copy and paste it.) and press Enter. Here J is the drive letter of the USB drive, and you can change it in line with specific cases. The drive will be formatted to FAT file system and the formatting is very fast.
Solution 3: Use PartitionGuru
If the first two methods do not work as expected for you then try to fix the issue with third party tool PartitionGuru. It's effective disk tool and partition manager and file recovery tool, which can check and repair bad sectors for local and USB drive, format partition or HDD, recover formatted and deleted data, etc. As the Windows can't format USB drive issue might be caused by bad sectors, we can check and repair bad sector for flash drive with PartitionGuru ahead of trying formatting.Step 1
Run PartitionGuru and see its main interface listing detailed information of internal and external drives and their partitions.
Step 2
Click the problem USB drive and menu "Disk" to select "Verify or Repair Bad Sectors".

Step 3
It displays cylinder conditions with colored blocks, such as good, severe, damaged, etc. When bad sector checking completes, it reports how many bad sectors it finds out. Then click "Repair" button to repair bad sectors.
Step 4
Select the USB drive and click "Format" button to format the flash drive.
Note:
Repairing bad sectors damages files stored on and near bad sectors, thus if files on the drive are important to you, you need to backup or recover data first.

Free Download PartitionGuru
File recovery from USB drive that can't be formatted
Such kind of problem is very common to those who often works with USB drive, and it might end up with losing all files and folders. However, you are able to recover lost data provided that USB devices are not totally dead. One thing you should keep in mind is that you might not be able to recover data completely if the drive is formatted or repaired. Thus file recovery should be performed first if the problem drive contains valuable files which haven't been backed up.Apart from checking and repairing bad sectors, PartitionGuru is able to recover lost files that are deleted, formatted, reformatted or corrupted from local or USB drives. File recovery process is read-only and doesn't do harm to original data and storage. Let's see how to recover files from USB drive.
Step 1
Connect the USB drive to computer and run PartitionGuru. Then you can see your USB flash drive or SD card is listed on the interface.
Step 2
Click on the drive and the button "File Recovery". Select "Complete Recovery" option and check the box "Search for Known File Types" on the Recover Files window, then you can start file scanning. This recovery tool allows users to preview files while file scanning is on-going as screenshot below:

Step 3
Select and save desired files to a secure location. When file recovery completes, you can try methods mentioned to format or repair it.

