November 5, 2016

How to Transfer Full Phone Contact List, Sms, Call Logs to any Android User in Just Seconds


Transfer your phone contacts to another phone is not a simple task for a normal user. Basically, you need internet or Gmail account for this setup. But what if you tell you can transfer your android phone full contact list, SMS, call logs to another phone user in just seconds.

This is possible from Cloneit android app. This app can clone any android mobile data to transfer it to another android phone. You can export your call logs, contacts, SMS and apps with this app.

Cloneit: For Transferring Phone Data


Cloneit can back up and transfer 12 types of mobile data from one phone to another in two easy steps, without the need for a cable, a computer or network.

[12 types of mobile data can be transferred]

Including contacts, messages (SMS, MMS), call logs, applications, APP data, all types of files in SD card (pictures, videos, music), calendar, system settings (Wi-Fi account passwords, browser bookmarks), etc.
The best transferring speed is up to 20M/s, which is 200 times faster than Bluetooth.

How to Transfer Your Full Phone Contact List, Sms, Call Logs to Other Android User in Just Seconds


1. Download Cloneit Android app from Google Play Store in both of your android mobile device.

2. Now launch Cloneit android app in your both phone.Here you see two options Sender and Receiver.


3. Now the device from where you are sending data you need to select Sender button and at the same time the device where you are receiving data select Receiver button.

4. In the screen you see scanning process, In few seconds sender device will detect these signals you see another phone icon in your screen. Just tap on it and connect with it.


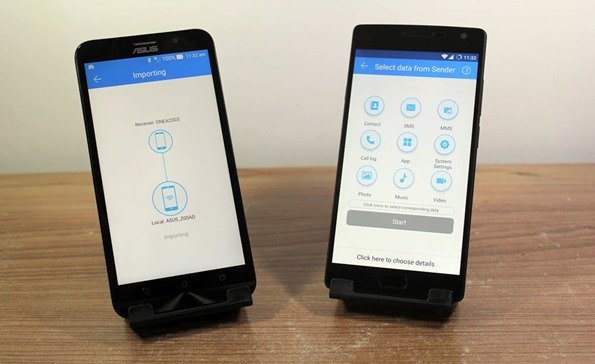
5. Now your both phone connected with each other from the wifi hotspot.In receiver phone, you see too many options for import.


If you wanna import ContactsSMSPhoto and Call logs just select it and tap the start button.

6. This is so simple and you successfully import the files from another android phone with the help of this app.

How to Extract and Copy Text From Any Images


Extract Text from any images online without downloading in your Computer. If you want to copy text from images like a boss, you came to the right place.

Here I show you how can you extract and copy text from any images online in just seconds.

How to Extract and Copy Text From Any Images Online


Project Naptha


Here we do this trick from downloading a chrome extension in your PC. Project Naptha is an amazing chrome extension that can extract and modify text from any images.

Project Naptha automatically applies state-of-the-art computer vision algorithms on every image you see while browsing the web. The result is a seamless and intuitive experience, where you can highlight as well as copy and paste and even edit and translate the text formerly trapped within an image.

Words on the web exist in two forms: there’s the text of articles, emails, tweets, chats and blogs— which can be copied, searched, translated, edited and selected— and then there’s the text which is shackled to images, found in comics, document scans, photographs, posters, charts, diagrams, screenshots and memes. Interaction with this second type of text has always been a second-class experience, the only way to search or copy a sentence from an image would be to do as the ancient monks did, manually transcribing regions of interest.

You can watch as moving your cursor over a block of words changes it into the little I-beam. You can drag over a few lines and watch as a semitransparent blue box highlights the text, helping you keep track of where you are and what you’re reading. Hit Ctrl+C to copy the text, where you can paste it into a search bar, a Word document, an email or a chat window. Right-click and you can erase the words from an image, edit the words, or even translate it into a different language.

Steps:


1. Download Project Naptha extension from Chrome Web Store in your Google Chrome Browser.


Download Project Naptha

2. Open any Image in your Browser and select like this.

3. Right Click on it and Select Copy Text for extracting text from any images.


You can copy text from any Internet Meme from using this Extension in your PC.

May 2, 2016

Unable to set default printer 0X00000709


This error is related to the old printer you have set as default before. Printers name that was recorded in your registry are priority on the system which you cannot modify if you're trying to set a new default printer. So you have to manually modify the registry. Note that the registry section is very sensitive,  serious  problems might occur if you modify the registry incorrectly. Therefore, make sure that you follow these steps carefully.  For insurance included, move down the registry before you alter it.And that point, you can restore the registry if an issue happens. For Additional data about how to go down and restore the registry, click the accompanying article number to view the article in the Microsoft Knowledge Base:
How to back up and restore the registry in Windows: (http://support.microsoft.com/kb/322756/)

Now, here's how to troubleshoot:

1. Click the Start button and type "regedit", then right click and "run as administrator"


2. Now go to this location:

HKEY_CURRENT_USER\Software\Microsoft\Windows NT\CurrentVersion\Window


3. 
Located in the right column, you can change the device key v alue data to your printer name. Right click on the Device key then modify the data value (e.g. "HP Laserjet P1006,winspool,Ne03:")


Note: You MIGHT encounter this "Error Editing Value" which you are unable to modify the data,


All you have to do is to set "permissions" to the key, and this is how its done:

Right Click on the "Windows" key and choose "Permissions", check "Allow" -> Apply, then OK.

April 13, 2016

Excel 2013 hanging or freeze when opening file tab

Symptoms
When you use the File tab, also known as Backstage, in a Microsoft Office program, the program may crash. If you review the Application log in this situation, you find an ID=1000 event that has one or more of the following crash signatures.

Note In the event data, the value for Application Name may be one of the following:

Excel.exe, Msaccess.exe, Mspub.exe, OneNote.exe, Outlook.exe, PowerPnt.exe, or WinWord.exe

  • 32-bit versions of Office programs

    Module nameModule versionOffset
    Mso.dll15.0.4631.10000x00003ABC
    Mso.dll0.0.0.00x0000329C
  • 64-bit versions of Office programs

    Module nameModule versionOffset
    Mso.dll15.0.4631.10000x00000000013F766E
    Mso.dll0.0.0.00x00000000013EB86E
Cause
This problem has been reported after the installation of the July 8, 2014, update for Microsoft Office 2013.


This update installs version 15.0.4631.1000 of the Mso.dll file.
Resolution
To resolve this issue, install the updated version of Mso.dll from August 12, 2014, or a later version if there's one available. The steps to install the update depend on the kind of Office 2013 installation (Click-to-Run or MSI) that you have installed. 

To see whether you are using a Click-to-Run installation of Office 2013:
  • Windows 8 or Windows 8.1
    1. Start an Office program.
    2. Right-click the program's icon on the taskbar, then right-click the program name, and then click Properties. An example is shown in the following figure.


    3. On the Shortcut tab, note the path that's specified in the Target box.

      If you see \Root in the path, you have a Click-to-run version of Office 2013 installed. An example of this path is shown in the following figure.


    4. Click Cancel.
  • Windows 7
    1. Click Start.
    2. Right-click any Office 2013 program icon, and then click Properties. An example is shown in the following figure.


    3. On the Shortcut tab, note the path that's specified in the Target box.

      If you see \Root in the path, you have a Click-to-run version of Office 2013 installed. An example of this path is shown in the following figure.


    4. Click Cancel.

If you do not see \Root in the path that's specified in the Target box, you have an MSI installation of Office 2013.
  • Resolution for MSI installations of Office

    To resolve this problem, please install the following update:


    This update installs version 15.0.4641.1001 of the Mso.dll file.
  • Resolution for Click-to-Run installations of Office

    To see the latest version information for Click-to-run installations, click the File tab in any Office program, clickAccount (or Office Account in Outlook), click Update Options , and then click View Updates 

    For more information about installing Click-to-Run updates, go to the following Microsoft Office article.

Note If you cannot update your Office installation at this time, you can resolve this problem by uninstalling the update from July 8, 2014. The steps to uninstall the update depend on the kind of Office installation that you have on your computer.
  • Click-to-run (C2R) installations

    Use the steps in the following article to revert your Office 2013 Click-to-run installation to the version that's installed by the June 2014 update.

    Note Version 15.0.4623.1003 will be used in step 5.

  • MSI installations

    Follow these steps to uninstall the July 8, 2014 update for Office 2013.

    Note Because of the way in which Office updates are installed, you may have to perform these steps repeatedly until you no longer see KB2880987 listed as an installed update.
    • Windows 8
      1. Swipe in from the right edge of the screen, and then tap Search. If you are using a mouse, point to the lower-right corner of the screen, and then click Search.
      2. Type windows update, tap or click Settings, and then tap or click View installed updates in the search results.
      3. In the list of updates, locate and then tap or click update KB2880987, and then tap or click Uninstall.
    • Windows 7
      1. Click Start, and then click Run.
      2. Type Appwiz.cpl, and then click OK.
      3. Click View installed updates.
      4. In the list of updates, locate and then click update KB2880987, and then click Uninstall.
    • Temporary Solution:

               1.Check default printer and change to some other printer as default printer

               2.Stop or disable Printer Spooler service and check it.

February 20, 2016

How to send self destructive messages

Sometimes you need to share your private information such as password, credit card details or bank details with a friend or family member. you can send information via email or text message. But there is a chance that the person may forget to delete the information. So there is a risk that the information may be misused in the feature. But what if there is a system which can automatically delete the information from recipients devices after it has read? Sounds good right! In this article, I’ll show you How to send a self-destructive secret message.
Burnnote is a website which allows its users to send secure messages in a manner that the messages will be deleted immediately or after specified time as they have been read by the recipient.

How to send Self Destructive Messages with BurnNote

Suppose you have to send your personal details to your brother for an urgent purpose. To send the information using Burnnote just follow these simple steps.
1. Open your browser and visit Burnnote website.
2. Now sign up for an account. After creating the account, just click on new button to write a new message.
3. Type your message in the text area provided and click on options.
burnnote for sending self destructive messages
4. By default, Burnnote will set the timer for deletion of the message based on the text. If you want you can also set the timer for deletion. Password option will be available for additional security.
5. After that click on next button. If you want to email the message to any person, just provide an email  address of him and click on send button to send the secret message.
6. If you want to send the information as a text message, just click on Get link button and add a label for conversation.
send self destructive with burnnote
7. Burnnote will give you a link which you can send to the recipient. Ones he clicks on that link it will be directed to Burnnote site. When he opens the message the timer will be started and the message will be deleted permanently after the timer expires. Unread messages will be deleted after 72 hours.
how to send messages with burnnote
So By using Burnnote we can send  messages which can be deleted automatically after they have been read by the recipient. Burnnote is also available as Android and IOS application.