December 4, 2017

How to install Windows 10 on GPT disk using UEFI bootable USB - Using Rufus


           New Windows 10 computers use UEFI firmware instead of the traditional BIOS. As you probably noticed when using a MBR-partitioned Windows installation USB drive on a new Windows 10 PC, UEFI will not recognize it as a boot media. UEFI-based computer can only boot from GPT-partitioned USB drive. Luckily, for backward compatibility most of the UEFI systems can also be configured to disable UEFI secure boot and instead revert to legacy BIOS boot mode. In this tutorial we’ll explain how you can easily create a UEFI or legacy bootable USB drive for Windows 10 Setup.
Requirements:
  • A USB drive (a microSD, SD card or memory stick) with the minimum capacity 4 GB
  • USB creation tool ISO2Disc
  • Windows 10 ISO image, which can be downloaded from Microsoft’s website using its Media Creation Tool
How to Create UEFI or Legacy Bootable USB Drive for Windows 10 Setup
If you have the Windows 10 ISO image on your PC, you can choose to make a Windows 10 bootable USB drive with UEFI or legacy bootloader. 64-bit UEFI PC can only boot 64-bit version of Windows 10, while 32-bit UEFI PC can boot 32-bit OS only. So if you want to install Windows 10 with UEFI mode, you have to download a correct version of Windows 10 ISO image.
Before get started, make sure you backup all important files stored in your USB drive. The process of creating a bootable USB drive will erase all data and re-partition your USB drive.
  1. Insert the USB drive into the USB port of your computer.
  2. Launch the ISO2Disc program. Click on Browse to select the Windows 10 ISO file.
  3. Now you have two options: make a bootable CD or USB drive. We’re explaining how to create a Windows 10 USB installer, so click on “Burn to USB Flash Drive” and select the drive letter of your USB disk from the list.
  4. Choose the partition style that is suitable for your target computer. If you want to install Windows 10 in UEFI mode on UEFI-based PC, choose the “GPT (required for UEFI boot)” option.
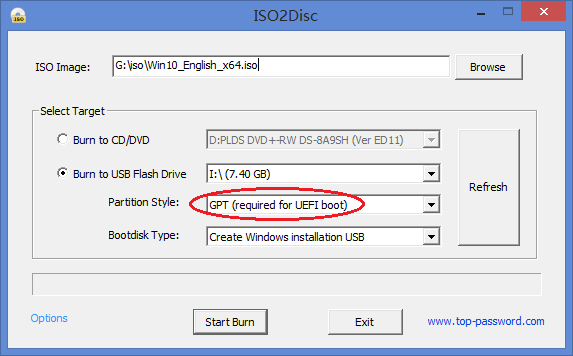
    iso2disc-uefi
    Otherwise choose “MBR (for legacy BIOS / CSM boot)” for BIOS-based PC, or UEFI computer running in legacy BIOS/CSM mode.
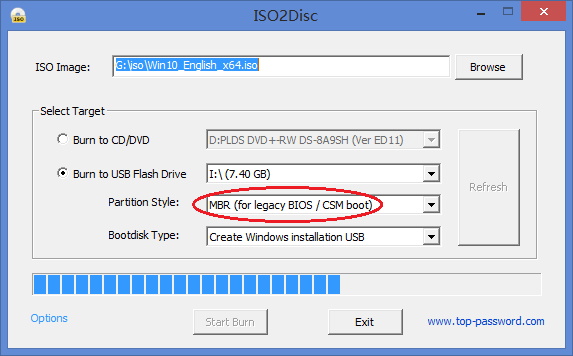
    iso2disc-legacy
  5. Click on Start Burn. It will now create a Windows 10 USB installer. After creating, you’ll find out that a UEFI bootable USB drive was formatted as FAT32 because NTFS is not supported for external boot media under UEFI.
Of course, there are also some other USB creation tools available on the net, such as Rufus. It also allows you to create UEFI or legacy bootable USB installation drive from Windows 10 ISO image.
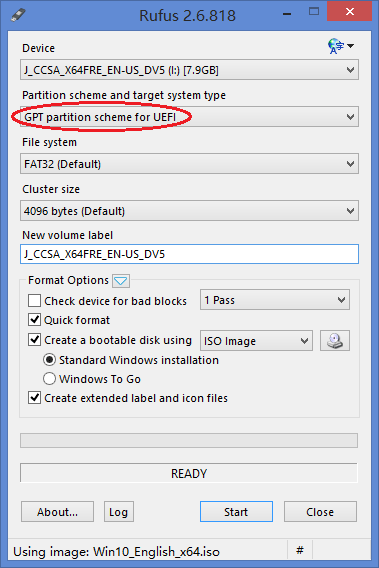
rufus-uefi
In This video i'll show you how to install windows 10 via UEFI bootable device and also converting your Hard Drive from MBR format to GPT format.


February 28, 2017

PowerPivot for Excel

  1. Go to the Microsoft Web site (http://go.microsoft.com/fwlink/?LinkId=258219).
  2. Download either the x86 (32-bit) or the x64 (64-bit) version of PowerPivot_for_Excel.msi installation program. The version of the add-in must correspond to the version of Excel on your computer. To determine whether you are using 32-bit or 64-bit software, look at the C:\Program Files folder.
    Download x86\PowerPivot_for_Excel_x86.msi if you have only “C:\Program Files”. Both the operating system and Office 2010 are 32-bit.
    Download x86\PowerPivot_for_Excel_x86.msi if you have both “C:\Program Files” and “C:\Program Files (x86)”, and the Excel.exe application file is found in “C:\Program Files (x86)\Microsoft Office\Office14”. The operating system is 64-bit, but the version of Office is 32-bit.
    Download x64\PowerPivot_for_Excel_amd64.msi if you have both “C:\Program Files” and “C:\Program Files (x86)”, and the Excel.exe application file is found in “C:\Program Files\Microsoft Office\Office14”. Both the operating system and Office 2010 are 64-bit.
  3. Double-click the .msi file to start the Setup wizard. Click Run.
  4. Click Next to get started.
  5. Accept the license agreement, and then click Next.
  6. Enter your name, and then click Next.
  7. Click Install.
  8. Click Finish.

Verify Installation

Start Excel. After you install the add-in, you can open the PowerPivot window by clicking the PowerPivot tab on the Excel ribbon, and then clicking PowerPivot Window. An empty PowerPivot window opens over the Excel application window. You can then use the Import Wizard to add tables of data, create relationships between the tables, enrich the data with calculations and expressions, and then use this data to create PivotTables and PivotCharts. For more information about PowerPivot for Excel, see Learn About PowerPivot Capabilities and Take a Tour of the PowerPivot UI.

Differences between Excel and PowerPivot Workbooks

As mentioned above, there are differences between the PowerPivot window and the Excel window in terms of how you work with data in each. There are some also other important differences that we want to call out specifically:
  • PowerPivot data can be saved in workbooks that have the following file types: Excel Workbook (*.xlsx), Excel Macro-Enabled Workbook (*.xlsm), and Excel Binary Workbook (*.xlsb). PowerPivot data is not supported in workbooks with other formats.
  • The PowerPivot window does not support Visual Basic for Applications (VBA). You can use VBA in the Excel window of a PowerPivot workbook.
  • In Excel PivotTables, you can group data by right-clicking a column heading and selecting Group. This feature is often used to group data by date. In PivotTables that are based on PowerPivot data, you use calculated columns to achieve similar functionality. For more information, see Grouping Dates.