August 28, 2013

How To Update to Windows 8.1 Public Preview


        Microsoft started its Build Developer Conference this week, and being a crazy Microsoft fanboy, I was excited to get my hands on the new Windows 8.1 preview. If you want to update your Windows 8 or Windows RT system to the new public preview, there’s a couple ways to do it. Here’s a look at the steps I went through to update my Surface RT via the Windows Store.
Then I cover what you need to know if you’d rather use the ISO, which is available as a separate download.

Note: Before updating, make sure to read my article on what you need to know Before doing an upgrade. This version is a Preview, and not the official final release. I don’t recommend updating your system if you only have one computer running Windows 8 unless you’re a power user and know what you’re doing. For this article I am showing the update process for my Surface RT. I also updated my Lenovo ThinkPad – running the full version of Windows 8 Pro – and the steps are virtually identical.

Update to Windows 8.1 Online Through Windows Store

Using the standalone install is probably the easiest way to update. First head to this Microsoft site to download Windows 8.1 Preview. Click the Get Update button to download the Windows8-RT-KB2849636-x64.msu file.    
     Download update


Then install the standalone installer, it just takes a second or two and when it’s done, you’ll need to restart your computer for the update to take effect.


After your computer restarts and you log in, you’ll see the following screen. Tap or click Go to the Store.


The Microsoft Store will launch and you’ll see more information on the Win 8.1 update and start the download.


It takes quite a while for the update to download, but you can keep using your computer normally while it is. A message will pop up when you need to take more actions with it.


After the preview is downloaded, you’ll get the following screen. Make sure to back up anything you’re working on and the computer will restart a few times during the update. Your computer will restart a few times, so be patient.


When it’s ready, you’ll need to work through a setup wizard, similar to the one you worked through when first installing Windows 8. You need to select between express or custom set up, enter your Microsoft account email and password, security codes, and a few other settings. It’s straight-forward, just follow the onscreen instructions. After that, you’re done!
Here’s a shot of the new Start button available on the desktop view on my Surface RT. Also Notice it now has Outlook 2013. It’s free and part of the update. Previously Windows RT only had the Mail app – which was less than decent for email, to say the least.


Update to Windows 8.1 with ISO

If you don’t want to update over the web, you can also download a separate ISO file. That lets you install it at your leisure from a DVD or, my favorite way – by creating a bootable install flash drive.
Or with an ISO (3.5GB)you can run the new version on a virtual machine on Virtual Box or by creating a VM on a Windows 8 system with Hyper-V. If you’re running the Enterprise edition of Windows 8, and want to update, you’ll have use the ISO method.


Also, when using installing this way, you’ll need to enter in a an activation key, which is buried in Microsoft’s 8.1 Preview FAQ:

If you install Windows 8.1 Preview through the Windows Store, you don’t need a product key. If you download the ISO, you’ll need to enter this product key: NTTX3-RV7VB-T7X7F-WQYYY-9Y92F

Conclusion

After installing the update, you should definitely manually check Windows Update. On my Surface RT I found five updates, including an important Firmware update for the tablet.


In the end, all of my modern-style apps transferred just fine. On the laptop with Win 8 Pro, all of my files transferred over as well as the desktop program. There were a couple of minor apps I had to tweak, like setting my location in the Weather app, and resetting my signature in the Mail app … but nothing major. Now that I think of it, I should of backed up my app data specifically, but I will need to blow them all away again for the RTM.

Need to Know About Installing Windows 8.1?

  • The Update Caveat: First of all, if you do update to Windows 8.1 Public Preview, you need to know this is a preview version. Meaning, later this year there will be a final RTM version. When you move to the final version, you will have to reinstall any modern/metro-style apps and desktop applications you have installed. The metro-style apps aren’t a big deal because you can easily download them again from the Windows Store. However, your desktop programs will be more of a challenge.
  • No Way to Uninstall: If you update to WIndows8.1, and for some reason want to revert back to regular Windows 8, there isn’t an easy uninstall process. Even if you were to try a PC Refresh or PC Reset, it will reinstall as Windows 8.1.
  • An ISO Version is Available: If you don’t want to update your existing Windows 8 system, Microsoft is making it Windows 8.1 available as a separate ISO file. This will allow you to install it on a virtual machine to test out first, before installing it via the Windows Store.
  • Inevitable Changes to Final Version: While Microsoft hasn’t made the final release dates official, I would assume TechNet and MSDN users will get the RTM in August, and it should be available to the public sometime in October. Either way, remember that there will undoubtedly be several updates during the public preview period, and things in the OS will change between now and the final release.

August 27, 2013

Boomerang Schedules Your Gmail Messages

What I need is a better option than an overstuffed inbox and cluttered folders where I’ll forget what’s in there. Boomerang can do just that:
Go to The Link

Click Install

Then Click add to the browser as extension..

  • Paying bills on time
  • Scheduled email in other time zones
  • Send a birthday message while it’s on your mind
  • Reminding yourself to follow-up with a client

Send an email later

screenshot of receiving emailWith Boomerang, you can write an email now and schedule it to be sent automatically at the perfect time. Just write the message as you normally would, then click the Send Later button. 
Use our handy calendar picker or our text box that understands language like "next Monday" to tell Boomerang when to send your message. We'll take it from there.

The best follow up reminders

screenshot of receiving emailWant a cleaner inbox, but don't want to lose track of important messages? Use Boomerang to take messages out of your inbox until you actually need them. Just click the Boomerang button when you have an email open, and choose when you need it again. Boomerang will archive the message. At the time you chose, we'll bring it back to your inbox, marked unread, starred, or even at the top of your message list.

Remind you if you don't hear back

screenshot of sending and boomerangThere are times you need to make sure you follow up within a specific time frame after sending a message. You can select to only be reminded if nobody replies, or regardless. This way you won't let messages slip through the crack and will never forget to follow up with people.

Now available for Mobile!

screenshot of date detection feature in emailHave you ever been out at dinner and remembered that you need to do something when you get to the office tomorrow morning? Now you can write an email while you're on the go, and have it arrive exactly when you need to be reminded—like 8AM the next morning.

Boomerang is a plugin that fits beautifully into the default Gmail UI. Let’s say that you get a message, but don’t need to have it handy until later. All you have to do is select the Boomerang tool and tell Boomerang when you need to see the message again.

August 24, 2013

Schedule (Send later) Your GMail Emails with Rightinbox

              Ever needed to send an email reminder or memo but just not right now? Reminders to submit a report or to prepare materials for an upcoming meeting would work better when sent at a timely manner. The receivers would appreciate it better when it doesn’t come too early for them to take it seriously or too late for them to be able to get anything ready.


Rather than draft the contents and keep it in the drafts folder, then forgetting all about it due to a busy schedule, why not let your email send the draft out for you? In this tutorial, we will show exactly how to do that with Rightinbox, a browser extension that integrates with your Gmail, to provide you with a ‘Send Later’ feature.

Note: Rightinbox is currently available on Mozilla Firefox and Chrome browsers on all platforms.
Install Rightinbox

First of all, you need to go to the Rightinbox website and download the extension.


Your browser (in this tutorial, we are using Chrome) will prompt to continue the download process, click on ‘Continue’.


Now, a pop up will appear on your browser just below the address bar. Click on ‘Install’.


Once installation is done, you will be notified.


Now if you have already opened your Gmail Inbox, refresh the page and you will get a notification. Click on the ‘Continue’ button.


And finally, Rightinbox requires access to your Gmail account to implement the ‘Send Later’ button. Click on ‘Grant Access’.


You have now completed the installation process. You will get another notification in your Gmail account. Simply click ‘Close’ and you will see that your Rightinbox is ready.

Schedule send an email

To start scheduling an email, simply click on the compose button.


Now, you will see not only a ‘Send Now’ button, but also an additional button called ‘Send Later’. Click on that button to schedule send an email.


You will be given an option to send the email following your preferred time. Selecting a preset time of 1, 2 or 4 hours, a day after, or set your own custom time for the email to be sent by clicking on ‘at a specific time’.


On ‘at a specific time’, there will be a popup window, fill up the specific time you want the email to be sent.


When the time is set, click on the ‘Schedule’ button to schedule the email.


That is all, your email is now scheduled according to the time you have specified.


Every time an email is scheduled, your email will be saved in the ‘Drafts’ folder, and when the time comes, the email will be sent automatically and transferred to your ‘Sent’ folder for your reference.
Conclusion

This feature is still not available on GMail but getting the Rightinbox extension will certainly make sure you do not miss out on sending an important email or reminder ever again.

Right Inbox now lets you track when an e-mail is opened

Right Inbox has added a new feature to its existing Gmail browser extension that allows you to track when an e-mail is opened.

We originally told you about Right Inbox and how it allowed you to schedule when your e-mails in Gmail were to be sent. The latest version of the extension adds the ability to track when your e-mails are opened. If you currently have the Right Inbox extension installed, you should already see the new feature when composing an e-mail.

If you don't have the extension currently, head on over to RightInbox.com/install to get it. You'll need to be using either Firefox or Chrome. 


After the extension is installed, compose a new message in Gmail. You will see a new button with a check box next to the title of Track. Compose your message as you normally would, check the box if you wish to be alerted when your e-mail is opened, and send it on its way.

Once the recipient opens the e-mail, Right Inbox will send you an e-mail alerting you to the fact the e-mail has been opened. It's that easy.

I'm not sure why anyone would want to know where the person opened the e-mail is located, as well as the exact IP address it was opened from, but that information is included as well.

I know the feeling of sending off an important e-mail, hoping it was received and not sent to a junk folder on accident. There's that time period when you begin to question if a follow-up e-mail would be too pushy, or come across the wrong way. Tracking will help to let you know if the e-mail has been opened.

RightInbox Adds Reminders to Gmail and Notifies You When Email You Sent Is Read


Firefox/Chrome: Right Inbox is an extension for Chrome and Firefox that works with your Gmail account to schedule emails for sending later.

Firefox/Chrome: RightInbox is an awesome tool for boosting Gmail's capabilities. The extension when it first launched was designed to schedule email for sending later, but RightInbox since then has added even more useful features: email tracking, link click tracking, and email reminders. 
Once you connect the add-on to your Gmail account, you'll find new buttons in Gmail for scheduling an email to be sent later, tracking an email you compose, and adding reminders to an email. With the tracking, you don't have to rely on read receipts. 

RightInbox sends you an email telling you when the recipient opened your message and if any links in your email were clicked. It'll even tell you where the person was when your email was opened. 
The email reminder feature lets you add a handy reminder at a specific time or if you don't get a response to your email. You can also set the email to go to the top of your inbox. With these new features and the send later feature, RightInbox really improves how you can work with Gmail. (Of course, the Sparrow development team working on Gmail will probably enhance Gmail quite a bit too.)

August 22, 2013

How to increase Virtual Memory size (if ram is low)

If your computer is slower then one of the most vital causes is the installed RAM. If your RAM size is small and you are running more applications at a time, then you may face different problems. 


To avoid such problems windows create a virtual memory space on your HDD and it automatically manages it. Virtual memory is nothing but the reserved memory space in your HDD to assist RAM. By increasing the virtual memory available for your system you can increase the performance of your system. Please follow the simple steps below to increase your system's performance.

NOTE:-Low RAM size is not the only problem for slower performance. The performance of your system also depend upon your processor speed and other factors. So by increasing only the virtual memory you may not experience more performance speed. Increasing the virtual memory will increase your performance a bit.

Step 1:- Go To Advance System Settings


In Windows XP
In windows XP right click on the My Computer and select "Properties". You will find the "System Properties" window. In this window click on the "Advanced" tab to reach to the Advanced System Settings.
In Windows Vista and later
In Windows Vista and Windows 7 right click on the My Computer and select "Properties". You will find a window giving you the information regarding your window version, RAM, Processor information. In this window click on the "Advanced System Settings" located at left side.

Otherwise you can also go through the Control Panel --> System.

Step 2:- Go To Performance Option


In the Advanced tab of the System Properties locate the Performance group and click on the "Setting" to reach "Performance Option". In the performance option window click on the "Advanced" tab.

System Properties

Step 3:- Reach the Virtual memory Settings Window.


In the Advanvced tab of Performance Option locate the Virtual Memory group and click on "Change" to reach at the "Virtual Memory" Window.
Here you can find the actual size of the virtual memory for your system. Uncheck the "Automatically manage paging file size for all drives" check box to set virtual memory yourself.

You can select the drive in which the virtual memory will be created. When you select a particular drive the window will show you the free space available on that drive.

Virtual Memory 1Virtual Memory 2


In the above picture you can find that C drive is selected and the option "System managed Size" is active. If "No Paging File" option is selected then we are not using paging file in that particular drive.

N.B:- The page file is created during the Windows installation and resides on the hard drive in which windows is installed. Page files are measured in MB and otherwise known as virtual memory and the size of the page file is based on how much RAM is installed in the computer. By default, a page file is 1.5 times the amount of installed RAM. 

Step 4:- Change the Virtual Memory.


To set the virtual memory select the desired drive and see the recommended size and currently allocated size. Then select "Custom size" option. 
Now give a "Initial Size" and "Maximum Size" in MB and click on "Set" to set the virtual memory. 

Set Virtual Memory

You have to set the maximum size larger than the currently allocated size to increase the performance. For initial size it may be between the size of the installed RAM to currently allocated size.

NOTE:- While setting virtual memory make sure to close all the running programs. It is not mandatory to close all the programs but it is recommended. 

You must have administrative access to the system to change virtual memory size.

August 12, 2013

How To Change Windows 7 Logon Screen Easily [Without Using Hacks & Tools]

Finally Microsoft has incorporated a new feature in the latest version of Windows which allows the end user to change the logon screen background without having to use any hacks or third-party tools.
In previous version of Windows, user had no option but to use third-parry tools like Tune-Up-Utilities to change the logon screen background. But in Windows 7, the case is different. Windows 7 now supports customization of Windows 7 logon screen officially. Replacing the old logon screen is as easy as changing desktop wallpaper (desktop background). Thanks to withinwindows for finding out this excellent feature.
Windows 7 logon background
Follow the given procedure below to change the Windows 7 logon screen:
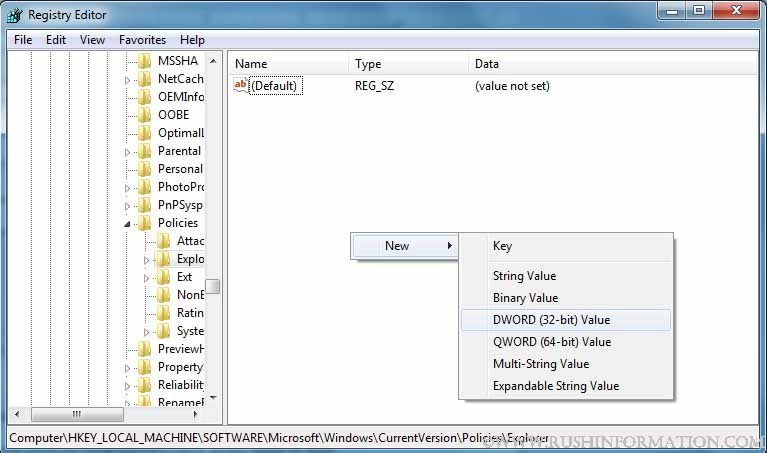
Step 1: Download the registry file from here. Extract the file and double-click on the file to enable this feature (Alternative method: right-click, select Merge).
Step 2: Now, head over to the following folder:
C:\Windows\System32\oobe (“C” is your Windows Seven Installation drive)
Step 3: Here, create a new folder named Info. Again, create a new folder inside the Info folder and rename it as backgrounds.
Step 4: Copy your favorite image file to this folder and rename it as backgroundDefault. Note that the image must be in JPG format and the size should be less than 256 KB.
Step 5: You are done. Reboot your system and see the change.
The following files (sorted by width-to-height ratio) are supported in C:\Windows\System32\oobe\Info\Backgrounds folder:
* backgroundDefault.jpg
* background768×1280.jpg  (0.6)
* background900×1440.jpg  (0.625)
* background960×1280.jpg  (0.75)
* background1024×1280.jpg (0.8)
* background1280×1024.jpg (1.25)
* background1024×768.jpg  (1.33-)
* background1280×960.jpg  (1.33-)
* background1600×1200.jpg (1.33-)
* background1440×900.jpg  (1.6)
* background1920×1200.jpg (1.6)
* background1280×768.jpg  (1.66-)
* background1360×768.jpg  (1.770833-)
And users who prefer to use a third-party instead can check out free tools such as Windows 7 Logon Screen Changer and Logon Screen Rotator to set your own picture as logon screen background withe a mouse click. How to change Windows 8 lock screen guide might also interest you.

Windows - Disabling AutoRestart

This document explains how to disable Autorestart, a feature whereby Windows XP, Vista, and Windows 7 automatically restart the computer following severe system crashes.
When an XP, Vista, and Windows 7 system is set to automatically reboot upon system failure, it will restart so quickly that the diagnostic Blue screen will scarcely be perceptible, much less readable. In these cases, sometimes it is useful to disable this feature, so that if the problem reoccurs more troubleshooting information is available to the user. For information on Blue Screens and how to troubleshoot them, see Windows - Troubleshooting Blue Screen Errors.
To disable Auto-Restart, follow these steps:

Windows XP

  1. Right-Click on "My Computer", and click "Properties" from the context menu that appears.
  2. Click on the "Advanced" tab.
  3. Click on "Settings" under "Startup and Recovery" (see screenshot).
  4. Uncheck the box labeled "Automatic Restart".
XP Advanced Properties Sheet

Windows Vista/7

There are two ways to disable Auto-restart in Vista.
Disabling Auto-Restart from the Advanced Boot Option This method can be used even when the computer is not bootable; simply restart the machine and tap F8 repeatedly right after the manufacturer's startup screen appears, exactly as if you were booting into Safe Mode. If done properly, you will see the "Advanced Boot Options" menu. Select "Disable Automatic Restart on System Failure" and hit enter. The computer will attempt to boot with Auto-Restart disabled.
Disabling Auto-Restart from the System Properties Window The second means of disabling Auto-Restart is very similar to the procedure for XP, and thus only works if the system boots.
  1. Right-Click on "My Computer", and click "Properties" from the context menu that appears.
  2. Click "Advanced System Settings" in the "Tasks" sidebar (screenshot).
  3. Click on "Settings" under "Startup and Recovery".
  4. Uncheck the box labeled "Automatic Restart".
Vista System PropertiesLastly, note that even when the system automatically reboots, a technician with the right tools can still gather the blue screen information ex post facto.

August 8, 2013

How to Hide Hard Drive in Windows 7/Vista/XP : Different Ways

  • First of all Go to RUN and Open Group Policy Editor.Type ‘gpedit.msc’ in RUN Dialog Box to Open Group Policy Editor
  • Now Go to User Configuration and Select Administrative Templates as shown below in the Image
  • After Selecting Administrative Templates  on the Right Hand Side You Will See ‘Windows Components’ Folder and Double Click on that Folder as shown below in the Image
  • Scroll Down to the Bottom and Search For the Folder ‘ Windows Explorer’ and Double Click on that Folder as shown below in the image
  • Now Search For the Policy ‘Hide these Specified drives in My Folder’ and Double Click on that as shown below in the Image
  • Select the Enabled Option and Select the Partitions that You Want to Hide Under the Option ‘Pick one of the Following Combinations’ as shown below in the Image
  • You are all Done and You Have Successfully Hide Hard Disk Partitions

Hide Hard Drive in Windows 7/Vista/XP Using Command Prompt

  • Run Command Prompt as an Administrator.You Must RUN Command Prompt as an Administrator to Use this Method Else it will not Work
  • Now Type the Following Commands One by One as Shown below in the ImageHow to Hide Hard Drive in Windows 7
  • Type ‘diskpart
  • Type ‘list volume
  • Type ‘select volume 7‘ (Note - Select the Volume/Partition That You Want to Hide Here I want to Hide the M Label Partition )
  • Type ‘remove letter m
  • It will Now Make Your M Label Drive Inaccessible and Will be Hidden
Note - You Can Unhide the Same Drive by Using the Command ‘assign letter m’ after Following all the Commands Upto Selection of Volume as shown in the above Image

Hide Hard Drive in Windows 7/Vista/XP Using Registry Editor

  • Go to Run and Type ‘regedit’ in RUN Dialog Box
  • Now Search For the Key  –HKEY_CURRENT_USER\Software\Microsoft\Windows\CurrentVersion\Policies\Explorer
  • Now You Need to Create a New DWORD (32-bit) Value by Right Clicking in the Right Pane as Shown below in the ImageHow to Hide Hard Drive in Windows 7
  • Give a Name to the New Key i.e Hide Drives Or No Drives etc and Double Click on that
  • Now Switch to Decimal Mode and Type the Value to Hide the Specified Drive i.e To Hide Drive B type 2 in the Value Field As Shown BelowHow to Hide Hard Drive in Windows 7
  • A: 1
  • B: 2
  • C: 4
  • D: 8
  • E: 16
  • F: 32
  • G: 64
  • H: 128
  • I: 256
  • J: 512
  • K: 1024
  • L: 2048
  • M: 4096
  • N: 8192
  • O: 16384
  • P: 32768
  • Q: 65536
  • R: 131072
  • S: 262144
  • T: 524288
  • U: 1048576
  • V: 2097152
  • W: 4194304
  • X: 8388608
  • Y: 16777216
  • Z: 33554432
  • ALL: 67108863
Note - If You want to Hide More Than One Drive then Enter the Sum of all the Values of the Drives For Example – If you Want to Hide Drive A,D,E then Type 25 (1+8+16) in the Value Field

Hide Hard Drive in Windows Using Third Party Software

You can Also Use Third Party Software’s to Hide Hard Disk Partitions in Windows.Here below is Some List of Free Tools to Hide Hard Disk Partition in Windows